I’ve loved GitHub Actions since they were released, but the one piece I always felt was missing was some kind of gating or more control around deployments. Now we can add manual approval requirements to our workflows through GitHub’s new Environments configurations. Environments also support environment specific secrets in additional to repository-wide secrets.
Create Environments
To demo environments and approvals I’ve created a simple .net web app, along with two Azure Web Apps (dev and prod). We’ll setup GitHub Actions to deploy our code to our Azure Web Apps.
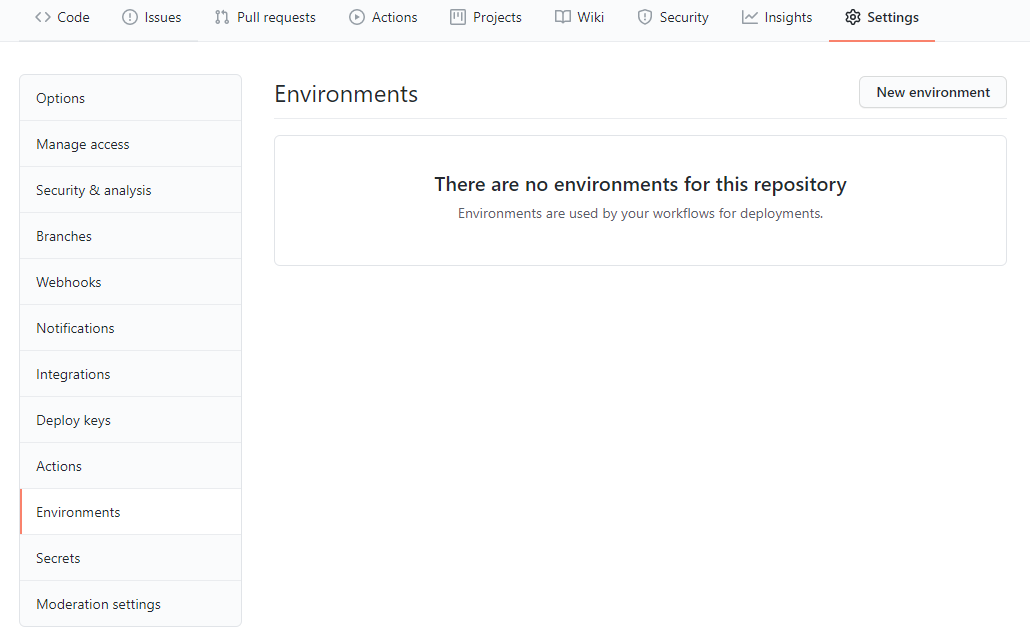
Let’s start by creating our first environment for our project. From your GitHub repo access Settings, and you should now see Environments in the left menu.
Click New environment, provide a name, and click Configure environment.
{: .box-note} Note: If you target an environment name in your GitHub Actions workflow file and that environment name does not exist GitHub will automatically create it for you. Only repository admins can configure environments with required reviewers, timers, and secrets.
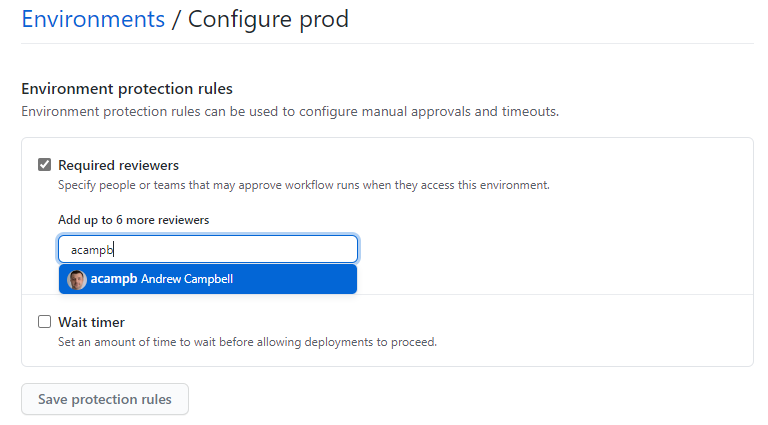
Check the box for Required reviewers and enter at least user or team name, and click Save protection rules.
For this project I’ve created a dev environment and a prod environment. You can create as many environments as required to suit your needs.
Configure GitHub Actions
At a high level the workflow I need for this project looks like this:
- Build the .NET application
- Automatically deploy the application to
dev - After approval, deploy the application to
prod
Now that we have the environments created, we can reference them within our GitHub Actions workflow file. Environments are referenced at the job level, so we will utilize three separate jobs.
The code snippet below illustrates how the environments are referenced in each job with the environment: name key-value pair. I’ve removed the individual steps within each job for readability.
jobs:
  build-and-publish:
    runs-on: ubuntu-latest
    steps:

  deploy-dev:
    runs-on: 'ubuntu-latest'
    environment: 'dev'
    needs: build-and-publish
    steps:

  deploy-prod:
    runs-on: 'ubuntu-latest'
    environment: 'prod'
    needs: [build-and-publish, deploy-dev]
    steps:
When any job references an environment the protection rules of that environment are enforced before any steps within that job are started. Because we are referencing two different environments we need to seperate our steps into different jobs, aligned to the environments.
GitHub Actions will attempt to execute all jobs in parallel. This is great for performance when jobs are not dependent on other jobs. Our workflow however does contain dependencies, so we must express those using the needs: configuration within each job.
Using multiple jobs also means that GitHub is initializing a new ubuntu-latest runner instance for each job. The files created by our .NET build job will be saved locally (and lost), so we will need to publish our .NET build artifact. The artifact is then downloaded with each deploy job. The full workflow code for this is shown later.
Configure Environment Secrets
Our Azure environment contains two Web Apps (dev and prod), in order to deploy our code we are going to use the Publish Profile from each within our GitHub Actions workflow.
The publish profile is a block of XML code containing connectivity and authentication information that GitHub Actions can utilize to deploy our code to our Web App. This can be downloaded as a zipped XML file directly from the Azure Portal, or easily retrieved from the Az CLI.
az webapp deployment list-publishing-profiles --name WEBAPP_NAME --resource-group RESOURCE_GROUP_NAME --xml
Each Azure Web App will have it’s own unique publish profile. We’re going to store each as a secret in our GitHub Environments.
From our GitHub repo access Settings, Environments, and click on an environment to configure. Under Environment secrets, click Add secret.
Use the secret name AZURE_WEBAPP_PUBLISH_PROFILE, and paste the XML block in the value, and click Add secret.
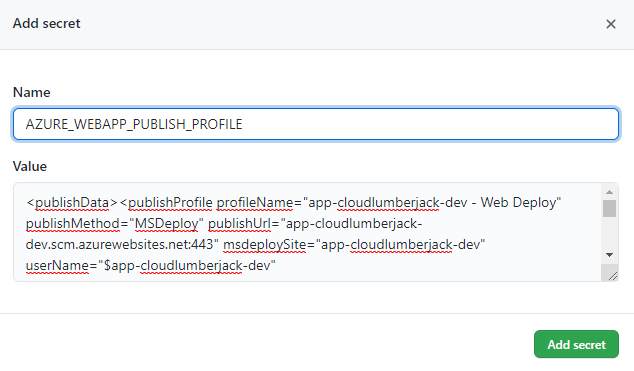
Once we’ve added the AZURE_WEBAPP_PUBLISH_PROFILE secret to our first environment (dev), repeat the steps to add a secret with the same name to our second environment (prod). Make sure you grab the publish profile XML code from the prod environment and add that to the secret value.
Now that we have the secrets stored in each environment we can reference them from our GitHub Actions workflow yaml file.
In the code snippet below notice that the Deploy to Azure WebApp step is accessing our secret using ${{ secrets.AZURE_WEBAPP_PUBLISH_PROFILE }}. Because this job is referencing our dev environment, GitHub will use the secret stored in that environment.
  deploy-dev:
    runs-on: 'ubuntu-latest'
    environment: 'dev'
    needs: build-and-publish
    steps:

      # Download published artifact
      - name: Download artifact
        uses: actions/download-artifact@v2
        with:
          name: published-app
          path: './published-app'

      # Deploy to web app
      - name: Deploy to Azure WebApp
        uses: azure/webapps-deploy@v2
        with:
          app-name: app-cloudlumberjack-dev
          publish-profile: ${{ secrets.AZURE_WEBAPP_PUBLISH_PROFILE }}
          package: './published-app'
Full workflow example
Below is the full GitHub Actions workflow yaml file to perform our application deployment, utilizing environments.
All of the code used for this article is available at my GitHub repo: https://github.com/acampb/github-environments
name: 'Deploy ASP.NET Core app to Azure Web App'

on:
  push:
    branches:
      - "main"

env:
  DOTNET_VERSION: '3.1.404'


jobs:
  build-and-publish:
    runs-on: ubuntu-latest
    steps:

      # Checkout the repo
      - uses: actions/checkout@master

      # Setup .NET Core SDK
      - name: Setup .NET Core
        uses: actions/setup-dotnet@v1
        with:
          dotnet-version: ${{ env.DOTNET_VERSION }}

      # Run dotnet build and publish
      - name: dotnet build and publish
        working-directory: 'app'
        run: |
          dotnet restore
          dotnet build --configuration Release
          dotnet publish -c Release -o './published-app'

      # Publish artifact
      - name: Publish artifact
        uses: actions/upload-artifact@v2
        with:
          name: published-app
          path: './app/published-app'

  deploy-dev:
    runs-on: 'ubuntu-latest'
    environment: 'dev'
    needs: build-and-publish
    steps:

      # Download published artifact
      - name: Download artifact
        uses: actions/download-artifact@v2
        with:
          name: published-app
          path: './published-app'

      # Deploy to web app
      - name: Deploy to Azure WebApp
        uses: azure/webapps-deploy@v2
        with:
          app-name: app-cloudlumberjack-dev
          publish-profile: ${{ secrets.AZURE_WEBAPP_PUBLISH_PROFILE }}
          package: './published-app'

  deploy-prod:
    runs-on: 'ubuntu-latest'
    environment: 'prod'
    needs: [build-and-publish, deploy-dev]
    steps:

      # Download published artifact
      - name: Download artifact
        uses: actions/download-artifact@v2
        with:
          name: published-app
          path: './published-app'

      # Deploy to web app
      - name: Deploy to Azure WebApp
        uses: azure/webapps-deploy@v2
        with:
          app-name: app-cloudlumberjack-prod
          publish-profile: ${{ secrets.AZURE_WEBAPP_PUBLISH_PROFILE }}
          package: './published-app'
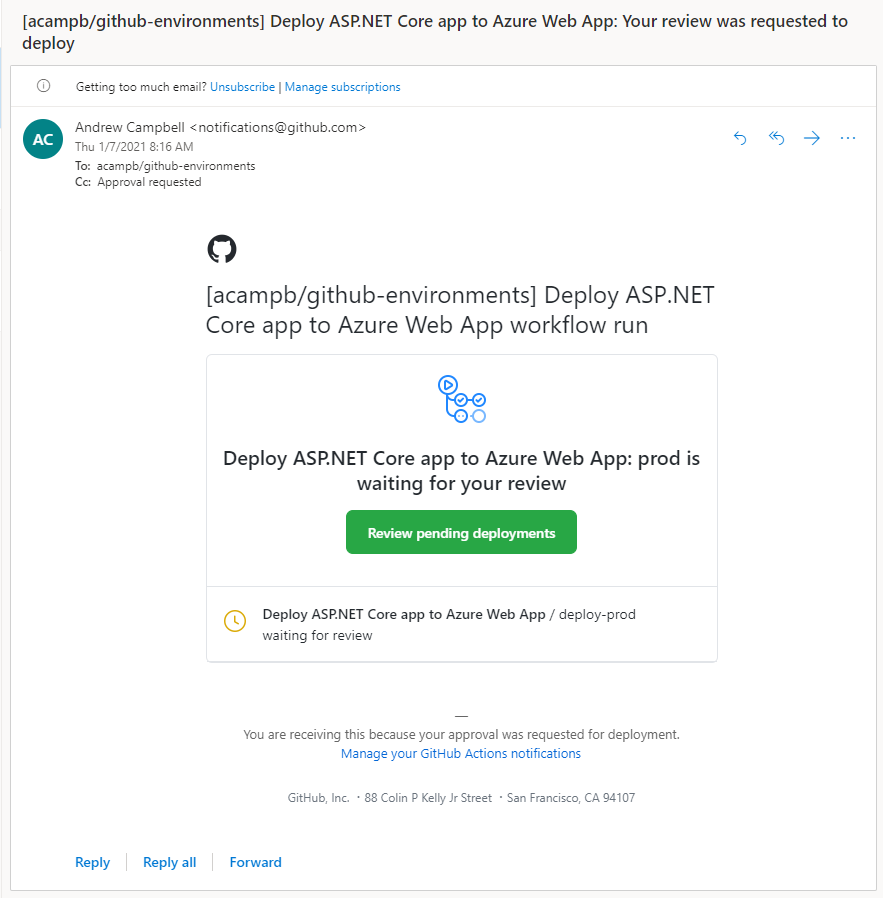
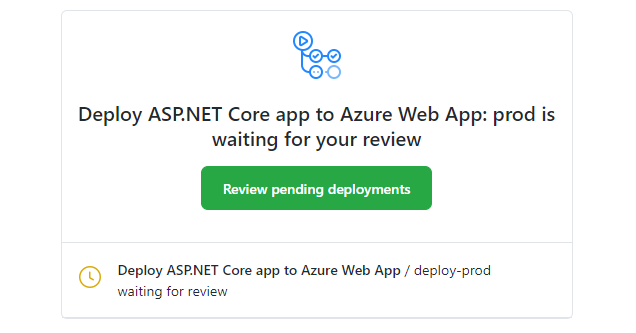
Approvals in action
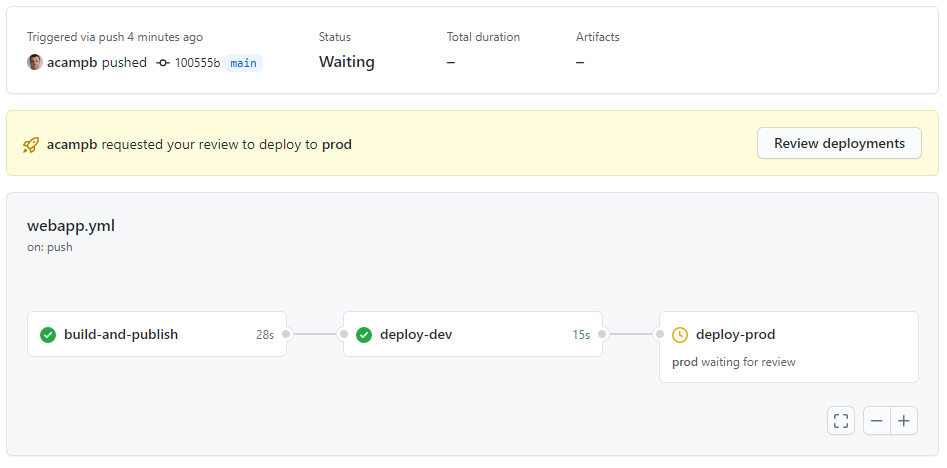
Our workflow is triggered by pushing to main, which will build and publish our application, deploy it to our dev environment, then wait for approval before deploying to prod. When viewing our workflow in GitHub we can see the deploy-prod job is waiting for approval.
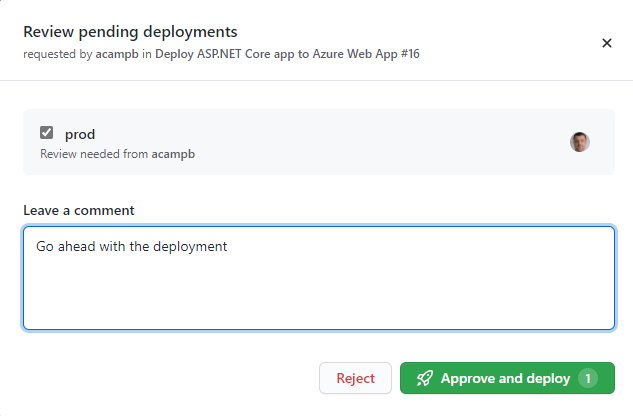
Clicking Review deployments allows us to provide our approval and add some comments.
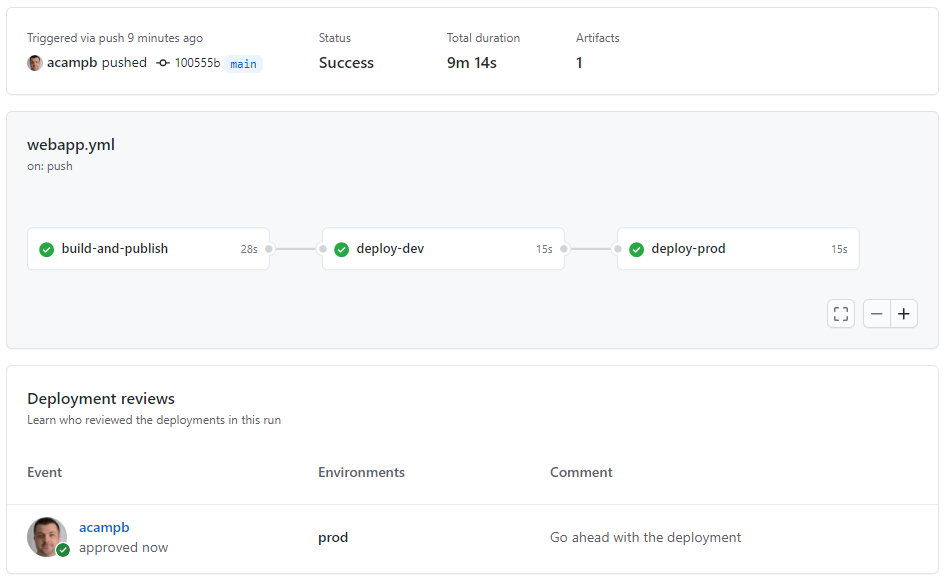
The deployment approval history is captured along with the workflow actions, providing some traceability to who approved, and any comments they supplied.
When approvals are required GitHub will also send the required reviews an email notification.