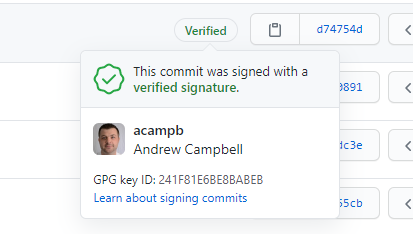
Want to see that sweet :heavy_check_mark: Verified status on your GitHub commit history? This guide walks through how to setup and configure everything needed on a Windows system!
Install GnuPG (GPG)
I’m a big fan of leveraging Chocolatey for package management on Windows. It makes things really easy to find and install software, and keep things up to date.
If you dont have Chocolatey already installed, head over to https://chocolatey.org/install and follow the instructions.
Install GnuPG with Chocolatey by opening an elevated PowerShell prompt and running the following:
choco install gnupg
If you prefer to install GnuPG manually you can download it here: https://www.gnupg.org/download/index.html
Generate a GPG key pair
Run the following command to start the wizard to generate your first GPG key:
gpg --full-generate-key
When prompted for GPG options provide the following:
| Prompt | Response | Note |
|---|---|---|
| Please select what kind of key you want: | (1) RSA and RSA (default) | GitHub supported GPG key algorithms |
| What keysize do you want: | 4096 | GitHub minimum is 4096 |
| Please specify how long the key should be valid: | 1y | No requirements from GitHub |
| Real name: | your name | |
| Email address: | your email address | Must match your verified email address with GitHub |
| Comment: | GitHub Verification |
You will be prompted for a passphrase to secure your key. Generate a nice secure password with something like LastPass to use.
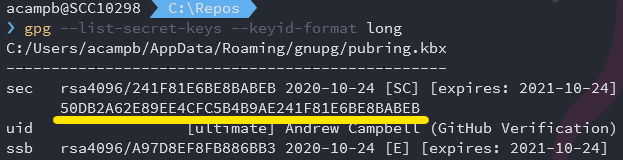
You can confirm your key was generated by running:
gpg --list-keys
Configure git to use your signing key
We’ll need to provide git with the id of the GPG key to use for signing commits. The output from gpg --list-keys will contain the id.
Configure git to sign all commits using this id:
git config --global user.signingkey 50DB2A62E89EE4CFC5B4B9AE241F81E6BE8BABEB
On Windows I’ve found that I also need to provide git with the filesystem path to the gpg executable. Without this option I’ve received messages from git such as
gpg: signing failed: No secret key. Configure git with this option (you may need to adjust your filesystem path to gpg.exe):
git config --global gpg.program "C:\Program Files (x86)\GnuPG\bin\gpg.exe"
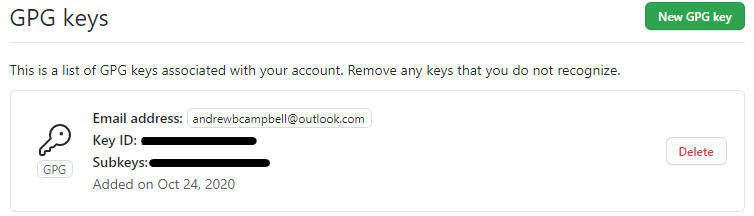
Add your public key to GitHub
We need to provide GitHub with the public key of the PGP key pair we generated. Run the following command to export the public key:
gpg --armor --export 50DB2A62E89EE4CFC5B4B9AE241F81E6BE8BABEB
Copy all of the text including the BEGIN PGP PUBLIC KEY and END PGP PUBLIC KEY lines.
On GitHub navigate to your account Settings and SSH and GPG keys. Click New GPG Key, paste your public key text in the text box, and click Add GPG key. You should now see the key stored in your GitHub account.
Signing commits
You should be all setup to sign commits now. When using git from a shell you need to add the -S option to indicate the commit should be signed with gpg:
git commit -S -m "this commit is signed"
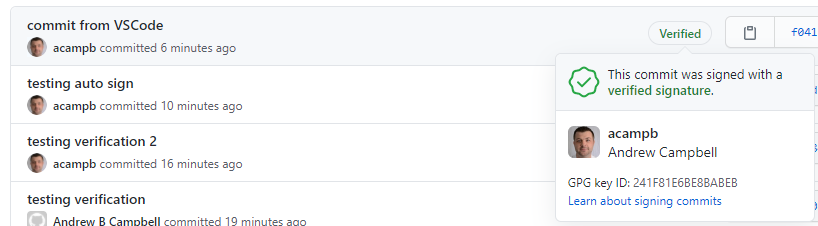
Git can also be configured to automatically sign all commits. With this option configured your commits from VSCode will also be signed.
git config --global commit.gpgsign true
Test out making a new commit and push to a GitHub repo, goto Code and commits and you should see the wonderful, green Verified badge!
Reduce GPG passphrase prompts
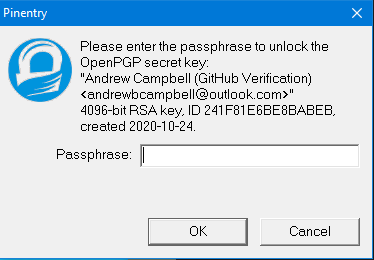
The passphrase you provided when generating your gpg is used to lock and unlock access to your private key when git attempts to sign a commit. The first time you instruct git to sign a commit you should be greeted by a passphrase prompt similar to this screenshot:
When you installed GnuPG, it also installed and runs a service named gpg-agent.exe that is responsible for caching this passphrase so you’re not prompted for it on every single commit. The default TTL for a cached passphrase however is 10 minutes. This is quite short for me, I’m not making commits every 10 minutes so it just ended up feeling like I was prompted for this passphrase every time. gpg-agent.exe contains some configuration options so we can adjust this behavior.
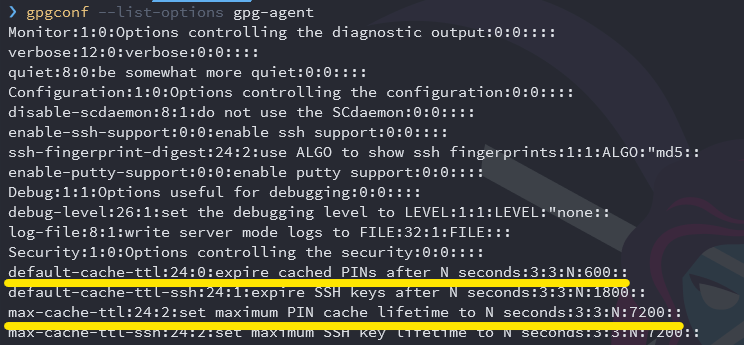
List all of gpg-agent.exe current configuration options using the following:
gpgconf --list-options gpg-agent
The options we need to configure are default-cache-ttl and max-cache-ttl. Both of these are configured with the number of seconds to cache the passphrase. The screenshot below shows the default values for both configuration options; default-cache-ttl set to 600, and max-cache-ttl set to 7200.
gpg-agent.exe reads its configuration from a file named gpg-agent.conf. This file needs to be in %APPDATA%\gnupg. By default this file does not exist, you will need to create it. You can use the PowerShell oneliner below to create the file and configure both options to 86400 (24 hours).
Set-Content -Path $ENV:APPDATA\gnupg\gpg-agent.conf -Value "default-cache-ttl 86400$([System.Environment]::NewLine)max-cache-ttl 86400"
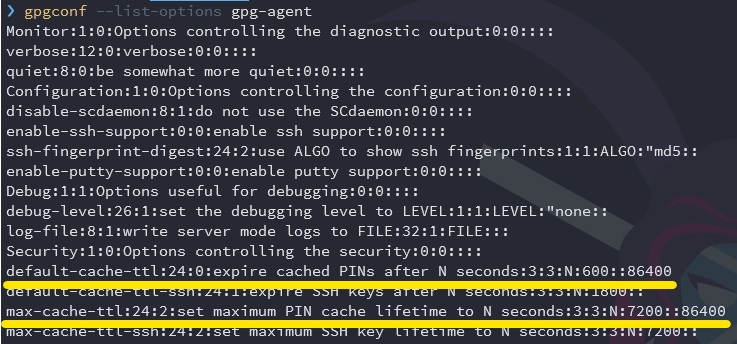
Run the following to restart gpg-agent.exe, and then verify the configuration options again:
gpgconf --kill gpg-agent

gpgconf --list-options gpg-agent
You should see 86400 as the configured value for both default-cache-ttl and max-cache-ttl
NOTE: There is a good bit of guidance that states the gpg-agent.conf file needs to be in %USERPROFILE%\.gnupg, however this would never work for me. If you have trouble getting gpg-agent.exe to pick up the configuration changes try changing the file path and restarting the agent again.